
Debugging technique for swift programming language using xCode.
As an iOS developer you might have used lots of technique while dealing with issues on apps. There are many debugging tools and techniques that you can use. But today I am trying to show you one technique which helped me a lot to debug my code. I think this will be helpful to you as well.
Today, I am going to talk about breakpoints. Breakpoint is very important and easy tool xCode provided us. I have been using it all the time and I feel awesome with it. Let me show you why.
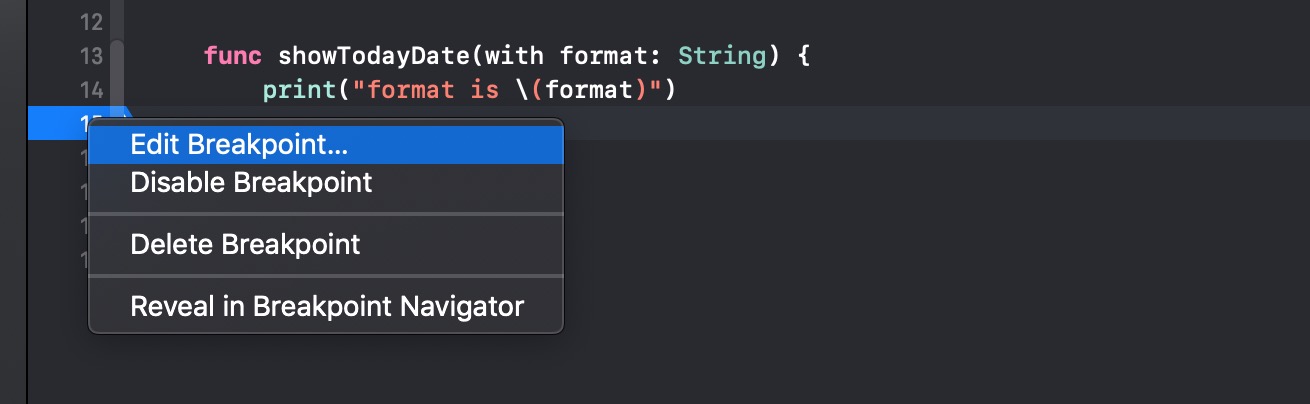
Normally what we do is, we execute print() and below that we set a breakpoint as shown in image below (line number 15). This helps us to see what is the value of format variable in console before going to next step. But doing this, we have added unnecessary lines of code which is not required later in our project. And we usually forget to remove print() method. Another demerit using this approach is, once the app is running, you cannot change the value within print() method. If you want to change it, you will need to go your code and change it and again need to run the app. This is not good. This will delay execution while running app, doing testing and most of all it kills your time.

So, is there a better way to call print() method, don’t forget to remove it and save time? Well, good news. There is indeed a better way to do this which I am going to explain now.
Instead of calling print() method directly onto your code, what you can do is, you can edit breakpoint. Let me show you how to do that.
- First right click on breakpoint and click Edit Breakpoint… as shown in image.
- Now click on Sound which is under Action section. There you will find Debugger Command option. Click it.

- Now instead of typing print() method in your code, you can write print code within Action section as shown in image below. po simply means print object. Apart from this, you can automatically skip breakpoints if you select option “Automatically continue after evaluating actions” to true. This will not stop on the breakpoint you have set. This is also handy tool while debugging.

Once above steps are done, now you can run the app once and you will be able to see the result in console section without need to add actual code within your main code which makes your code clean as well.
Breakpoint merits:
- You can simply drag away breakpoints and stop executing it.
- You can disable breakpoints not to execute by clicking on active breakpoints or you can do it by doing right click on breakpoint and clicking disable breakpoint.
- Best part is you can see all your breakpoints from Breakpoint navigator section as shown in image below. You can click and drag away all unnecessary breakpoints from here. And you are done. Awesome, isn’t it?
- You can change print methods while the app is in run mode which means you don’t need to change print code and run app again.

So, guys this is all I wanted to share today. There are many options you can play with with breakpoint under Action section. Please do check those and if you find many problem, please do comment down below. I will try to help you as far as possible.
Thank you guys for reading my blog. If you find helpful, please do share it.
✌️Peace✌️